
In this tutorial, I will show you how to add simple products to your WooCommerce shop page.
In WooCommerce there are options to add both simple products and product variations. Before you can add products to your e-commerce website, you need to go through the basic WooCommerce setup wizard.
Adding products to your WooCommerce website is super simple once you know how to complete this task. A good option is to also install the Yoast Duplicate plugin so you can copy an existing product are re-use the base for a new product. This will help speed up the data entry on your website.

How to add a product to WooCommerce
Below, I show you my step-by-step guide on how to add your first WooCommerce product.
Tip: You can click on any of the images below to enlarge.
Tip: View this article for how to add product variations in wooCommerce.
Note: In this tutorial, I will be using the Flatsome WooCommerce Theme but the logic of the tutorial can apply to any other Theme.
Table of Content
- Log in to the WooCommerce admin control panel
- Add a name for your WooCommerce product listing
- Add an SKU for your product
- Select a product category
- Add product tags
- Add main product image
- Add product main description
- Save the product as a draft
- Add a product short description
- Add meta description
- Add additional product images
- Making your product live
- WooCommerce FAQs
- Add a product to the WooCommerce video tutorial
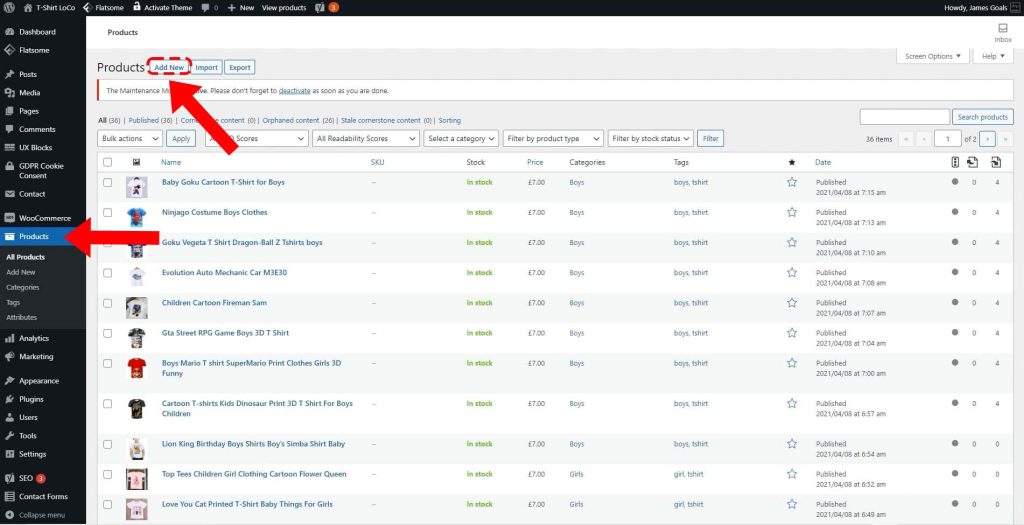
1. Log in to the WooCommerce admin control panel
On the left side menu options select “Products” and then select the “Add New” button.
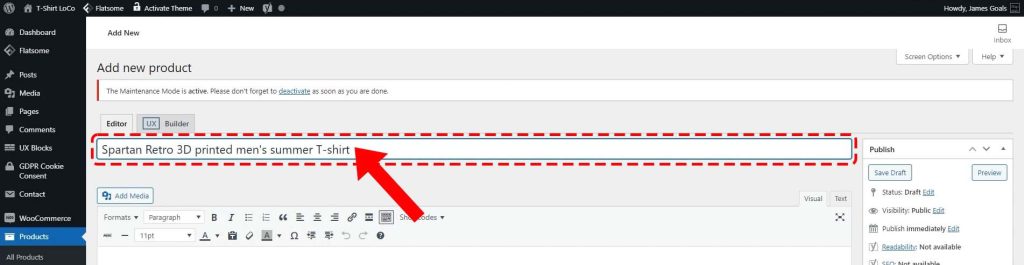
2. Add a name for your WooCommerce product listing
Tip: If your product is available in different colours, then try to incorporate the colour into the product name.
- Example: Men’s Polo T-Shirt Grey
- Example: Ladies Long Sleeve Dress Blue
- Example: Red dining room coasters
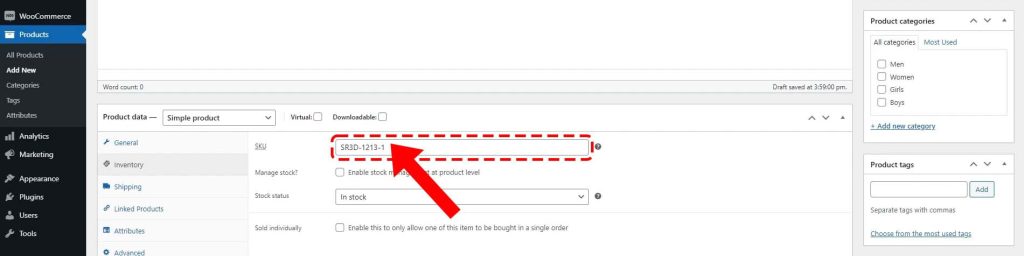
3. Add an SKU for your product
What is a Product SKU?
An SKU (Stock Keeping Unit) is a unique identification number used in your business to track product inventory.
SKUs are often alphanumeric and contain information on the most important elements of a product. An SKU code can incorporate any of the following:
- Price
- Colour
- Style
- Brand
- Gender
- Type
- Size
The content of an SKU’s information is often placed in priority order.
Example SKU: 25REDMTSSM
- 25 = £25.00
- RED = Colour
- M = Men’s
- TS = T-Shirt
- SM = Small
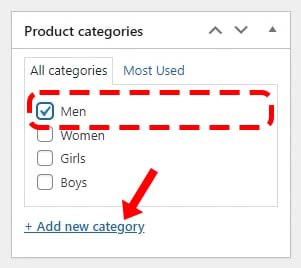
4. Select a product category
Note: Before adding a product to WooCommerce it is worth spending some time to build out your WooCommerce product category structure.
Tip: You can select more than one category for listing your product, but in most cases, you would select a single category.
- You can add new categories from the product view as well if required.
- Custom web design
- Secure and fast website solution
- Full management training
- Take control of your website
- SEO optimisation
- Reliable web hosting and emails
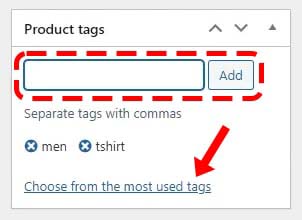
5. Add product tags
Product tags are optional, but I would suggest adding tags as this is searchable content.
Tags can be used to help customers find a specific product on your website.
For example, if you are listing a Grey T-shirt with a Spartan Helmet Graphic, then you might add the following tags:
- Grey
- Round Neck
- Spartan
- T-Shirt
Note: When you add the next product to your WooCommerce store you will be able to re-use the tags, as you type in a new tag it will automatically show if it has been used before.
- You can also select the “Choose from the most used tags” option.
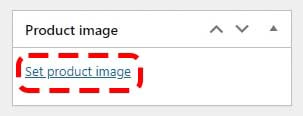
6. Add main product image
For all products you add to the shop, you need to assign the main image.
The main image is the image that is shown to customers when they are browsing your website.
Tip: Try to keep your images consistent.
- Take a look at the Bubsy Bu e-commerce website I created for my client as a good example of consistent product images.
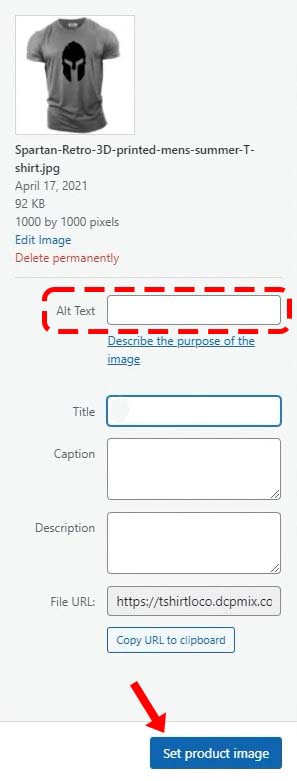
I would recommend adding images with the dimensions of 1000 pixel width and 1000 pixel height.
6.1 Select the "Set product image" link
6.2 Drag and drop the image into the media library
- Remember to update the Alt text.
- Select the “Set product image” button.
You can now see the image listed in the product.
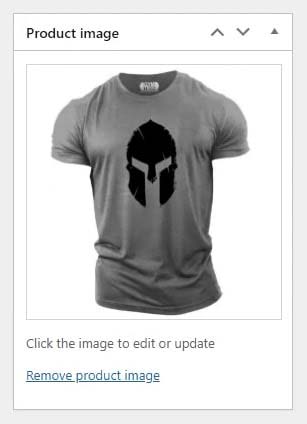
Note: You can simply click on the image to change it if required.
7. Add product main description
In this article I am listing a T-Shirt product, so I want to display a size table.
I suggest adding a size table for clothing-based products, for other products a general description should be fine.
Try to use bullet lists if possible when highlighting key features of your product.
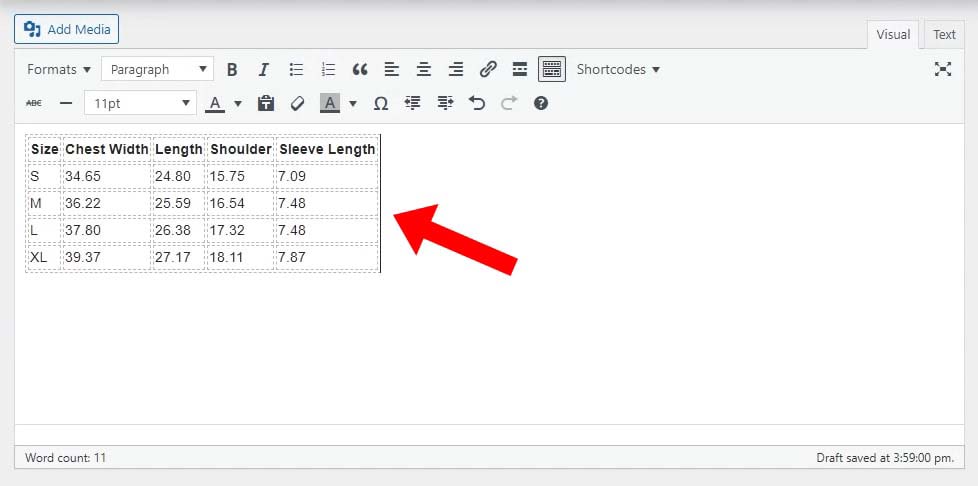
Below is the HTML table code I used for the size guide
					<table>
<thead>
<tr>
<th>Size</th>
<th>Chest Width</th>
<th>Length</th>
<th>Shoulder</th>
<th>Sleeve Length</th>
</tr>
</thead>
<tbody>
<tr>
<td>S</td>
<td>34.65</td>
<td>24.80</td>
<td>15.75</td>
<td>7.09</td>
</tr>
<tr>
<td>M</td>
<td>36.22</td>
<td>25.59</td>
<td>16.54</td>
<td>7.48</td>
</tr>
<tr>
<td>L</td>
<td>37.80</td>
<td>26.38</td>
<td>17.32</td>
<td>7.48</td>
</tr>
<tr>
<td>XL</td>
<td>39.37</td>
<td>27.17</td>
<td>18.11</td>
<td>7.87</td>
</tr>
</tbody>
</table>
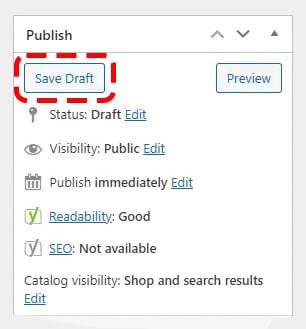
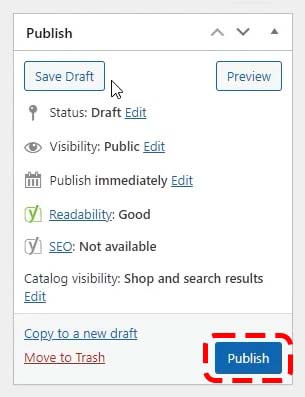
8. Save product as a draft
At present you have added a lot of information to your product listing, it is advisable to save your product listing as a draft copy.
Note: A daft product is not live, so only you can see the product on your website.
Saving the product as a draft is a good method of adding products to your website as you can save the content after a few completed steps.
It is worth taking the time to make your product listing the best as possible, this will help your customers when making a buying choice and you can also duplicate the product listing to create more products faster.
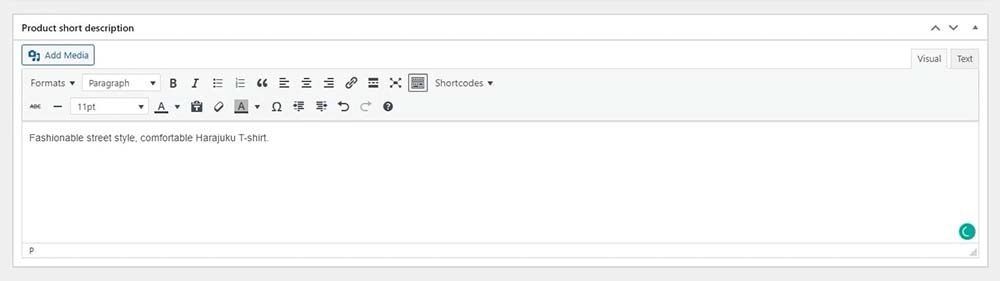
9. Add a product short description
On most WooCommerce themes you should be able to add a product short description.
The short description is often displayed near the top of the product listing page near the “Add to basket” button.
The short description can be:
- A block of text information
- A bullet list
- A combination of text and bullet list
The content can also contain URL links to alternative products or information pages.
The short description is optional but is a good idea to have some content that quickly explains the benefits and features of your product.
This is also good for search engine optimisation.
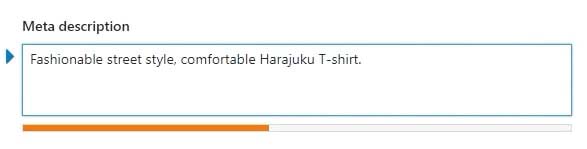
10. Add meta description
Just like the product short description, you can also add a custom meta description for your product listings. The meta description is used in the search engine results so it is important that it contain useful information.
Try to get the most important information about your product in the first 160 characters. I have seen a lot of websites state that the meta description should be 50 – 170 characters, this is not true!
The meta description can be any length, but I would suggest adding no more than 500 characters and making sure the most enticing product information is displayed first.
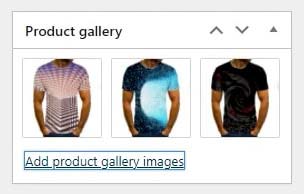
11. Add additional product images
In WooCommerce there is an option to add some additional product images.
I would recommend adding 4 or 5 additional images but this is totally optional.
If you are selling a clothing item then you might add an additional image for the:
- Back of the product
- Close-up of the product
- Close-up of the logo
- Model wearing the clothing item
The type of alternative images you upload will really depend on the product listing. I suggest you go and check out some competitor websites and see what works for them!
12. Making your product live
At present, we have been saving our product as a draft copy. Once you are happy with all the content added you can simply select the “Publish” button to make the product live on your website.
Don’t forget to promote your new product on social media like Instagram, Facebook, Twitter and even YouTube.
Well Done! – Your product is now live on your WooCommerce shopping website.
WooCommerce Frequency Asked Questions
What is WooCommerce?
WooCommerce is a plugin that you can download for free and install on a WordPress website. The plugin gives you a full turnkey e-commerce solution. You can simply add products, categories and general pages. Once completed you can add a payment gateway like PayPal or Stripe to accept payments. You can even set up discount codes and specific costs for the delivery of products based on a customer’s location.
What is a WooCommerce Theme?
A WooCommerce Theme often adds some additional functionality to a WooCommerce shop website which is not available in a standard WooCommerce Theme. The functionality can improve the speed of your website, add features like zooming in to product images, and customise the layout of pages, categories listings and product content pages. The goal of a theme is to give a user a more simple way to customise a WooCommerce Shop.
What is the best WooCommere Theme?
This really depends on the types of eCommerce shop you are creating. At DCP Web Designers we often use the Flatsome Theme as we find this theme to be highly customisable.
Add products to WooCommerce video tutorial
Article created by: Pankaj Shah | DCP Web Designers London